Introduction
Discover the power of "Templated geometry" in your Houdini Digital Assets when making tools for Unreal Engine! This feature, often overlooked, can change the way you make guide geometry and visualizers for your data inside your tools, you can customize it, and it has no impact on your baked output.
In this short post, I will quickly touch on the "Guide Geometry" feature, and I will quickly move onto the process of setting up the same guides (called "Templated Geos" when using Houdini Engine) so that they work inside Unreal. I will explain what the requirements are and show you the set up I use so that the process is automatic using Python.
Geometry guides that are editor-only, you don't have to turn off or make your own toggles, and will not bake with your outputs? Yes, it's possible!
Topics Covered
- Guide Geometry in Houdini.
- Using Templated Geometry in Unreal.
- Requirements for the Templated Geo to work.
- How do we set this up with Python? Making our own HDA utility.
Disclaimer
- Some basic Python knowledge is needed.
- I don't go over how to create Houdini Digital Assets.
- There are many ways of doing this. This is just one of those ways.
Houdini Guide vs. Template Geometry.
Houdini Guides: In the world of Houdini and HDAs, guides are key for visualizing data that you don't need baked in the output of your Digital Asset. They are used as follow:
- Create a Null Node: Start by placing and re-naming a "Null" node. This node will be used to represent the data you wish to visualize.
- Configure Digital Asset Properties: Open your Digital Asset's type properties.
- Access the "Node" Tab: Within the properties, navigate to the "Node" tab.
- Assign the Guide Geometry: In the "Node" tab, you will find an option to assign your node as the Guide Geometry. You can do this by dragging, typing, or selecting the "Null" node you've created. This designated node will be responsible for displaying the guides whenever you have the HDA selected.
If you want more information on this, Simon Verstraete already went over this topic a couple of years ago and I would recommend watching his short video here.
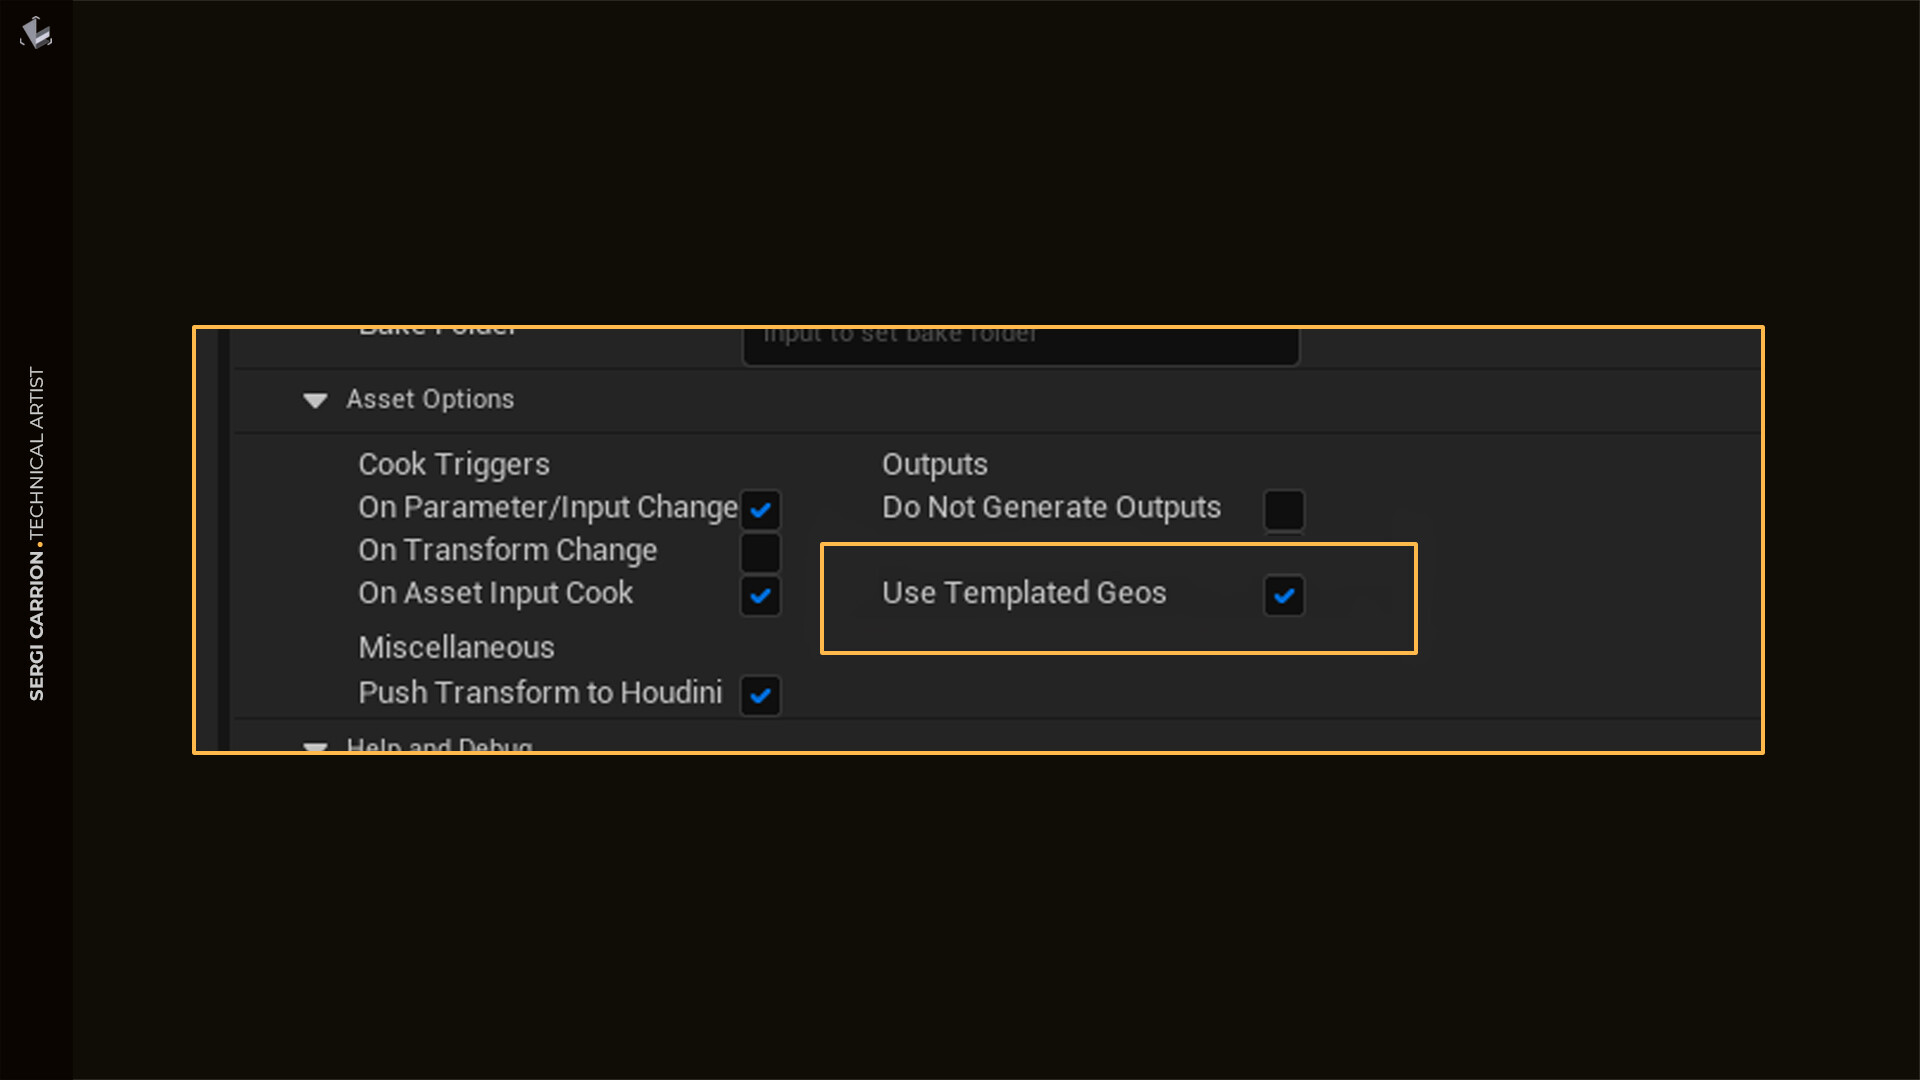
However, this will not work in Unreal when you use an HDA, you will have to make your own toggle, plug it in the output with a switch if you want to have it, and whenever you want to bake or keep the output of your HDA, you will have to remember to turn your toggle off. That's why they have the option of "Use Templated Geos". But what is it and how do we use it?
Use Templated Geos: Houdini Engine introduced an option called "Use Templated Geos". While it shares a concept with the "Guide Geometry" feature, it functions uniquely within Unreal Engine, and does not use the node in the "Guide Geometry" slot from within your HDA. This distinction, coupled with the lack of information online, can lead to frustration, but to alleviate this challenge, in the next section we'll go over on how to make it work.
Step-by-Step guide: Use Templated Geos
"Use templated Geos" makes use of the SOP flags that we already are familiar from Houdini. Leaving the "Template" flag on in the node that we want to use as guides, will be enough to make the feature work.
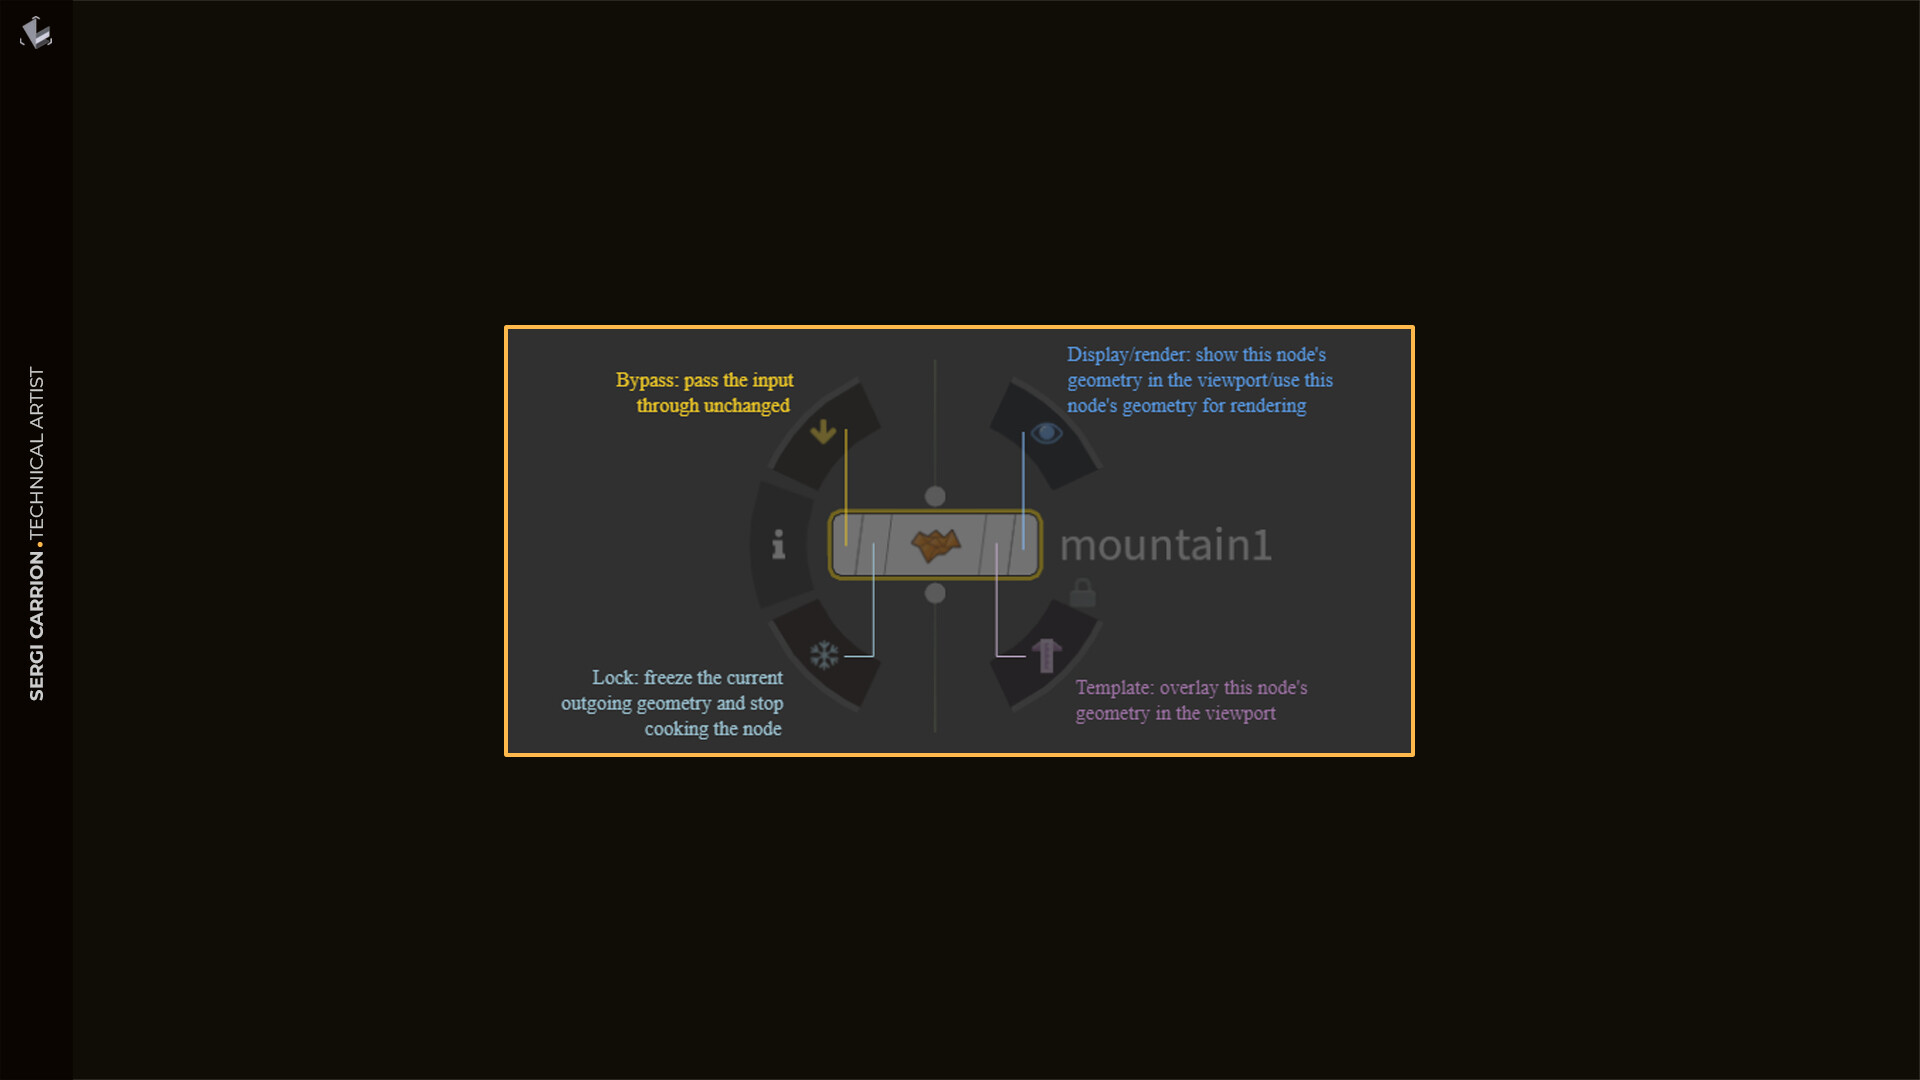
However, there is just one problem; Houdini developers frequently toggle these flags on and off. Very often, we not only want to display what we are currently looking at, but we also toggle the "Template" flag to see an overlay of a different node that we also want to track. Sometimes we even have multiple nodes with the "Template" flag on.
Does that mean that each time we save and update our HDA, we'll have to remember to uncheck the "Template" flag on every node and flag the one that we want to use as guides? Fortunately, the answer is no. Let's use some Python to fix that :)
Making a custom utility
First we will make a new utility so that we can reuse it in future tools:
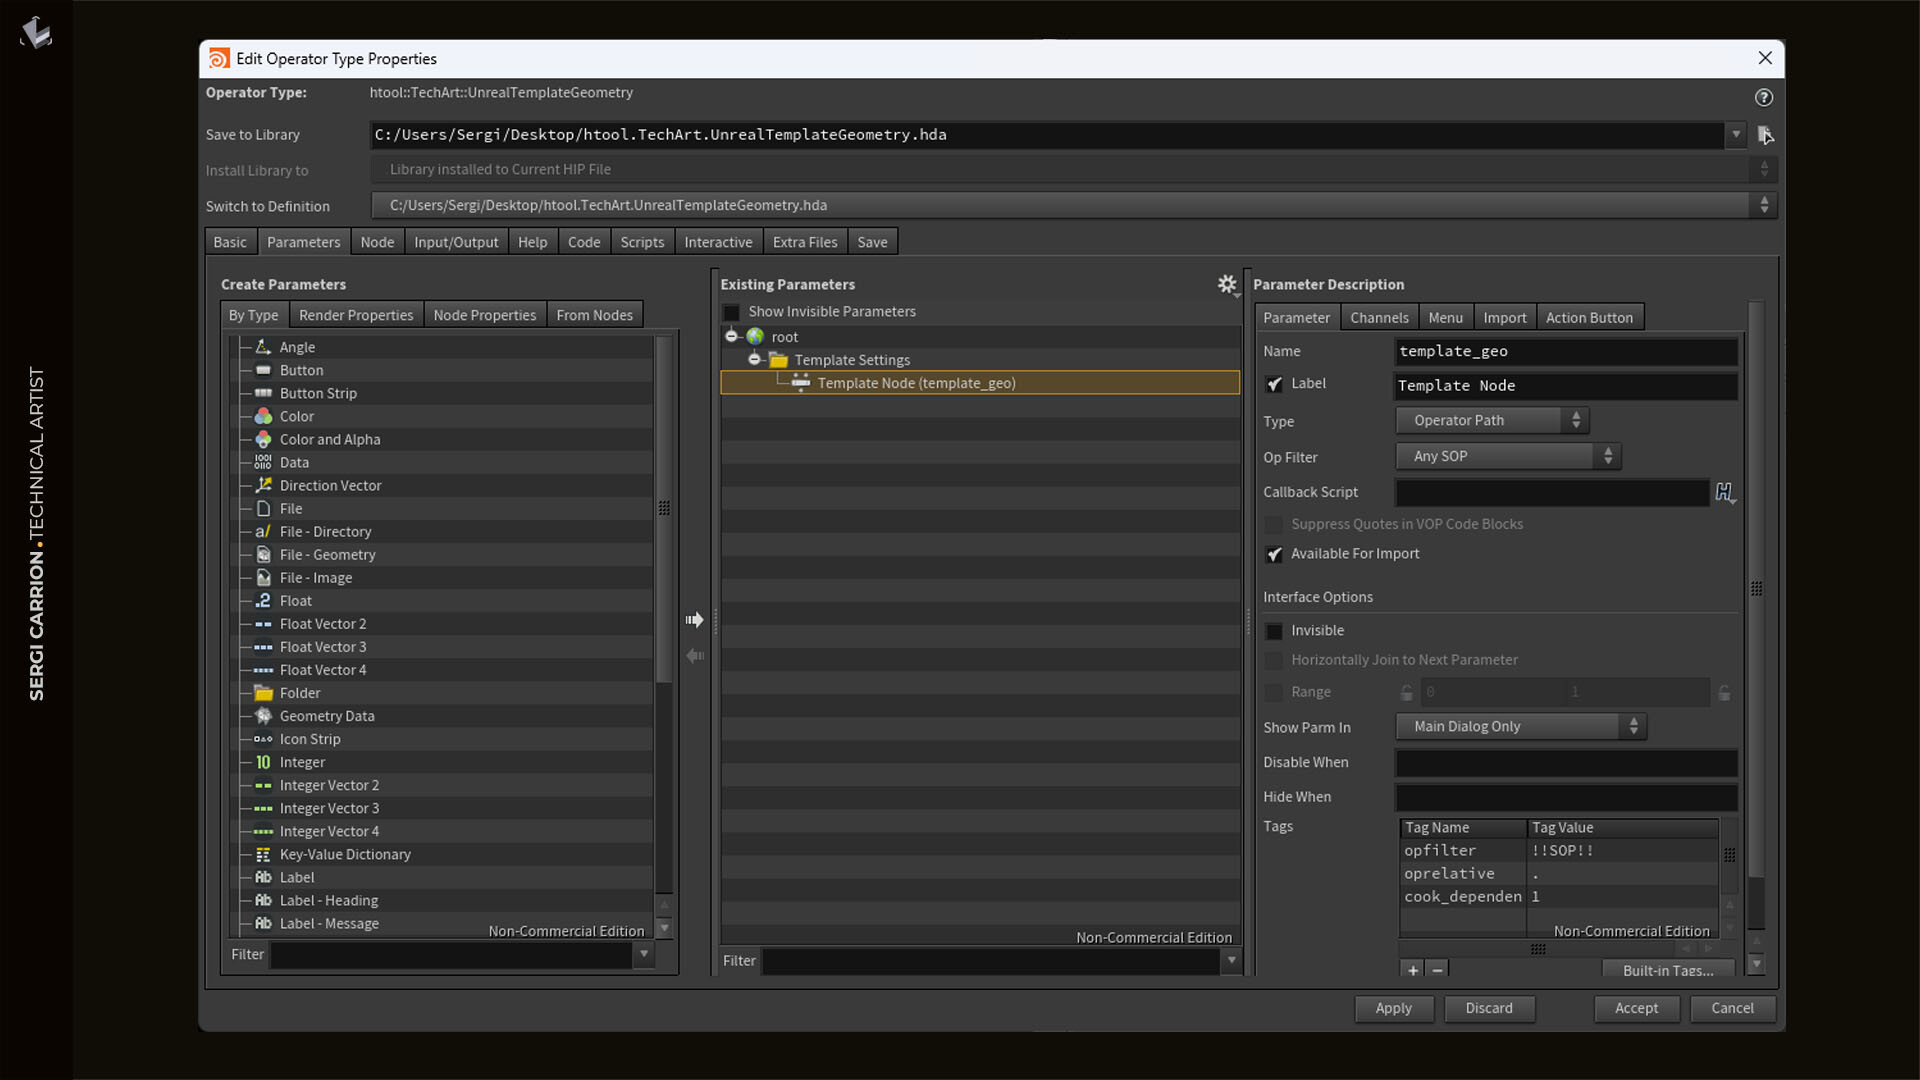
- Create an Empty Digital Asset: Start by generating an empty Digital Asset. Navigate to the "Type Properties" and under "Parameters," create a new parameter (let's name it "template_geo") with the "Type" set to "Operator Path." Don't forget to save your HDA at this point.
- Disable Template flags: Next, put down a "Python" node inside your subnetwork. In this initial node, we will verify whether we're working within Houdini. If not, we'll identify all nodes with the "Template" flag enabled and we'll disable them all.
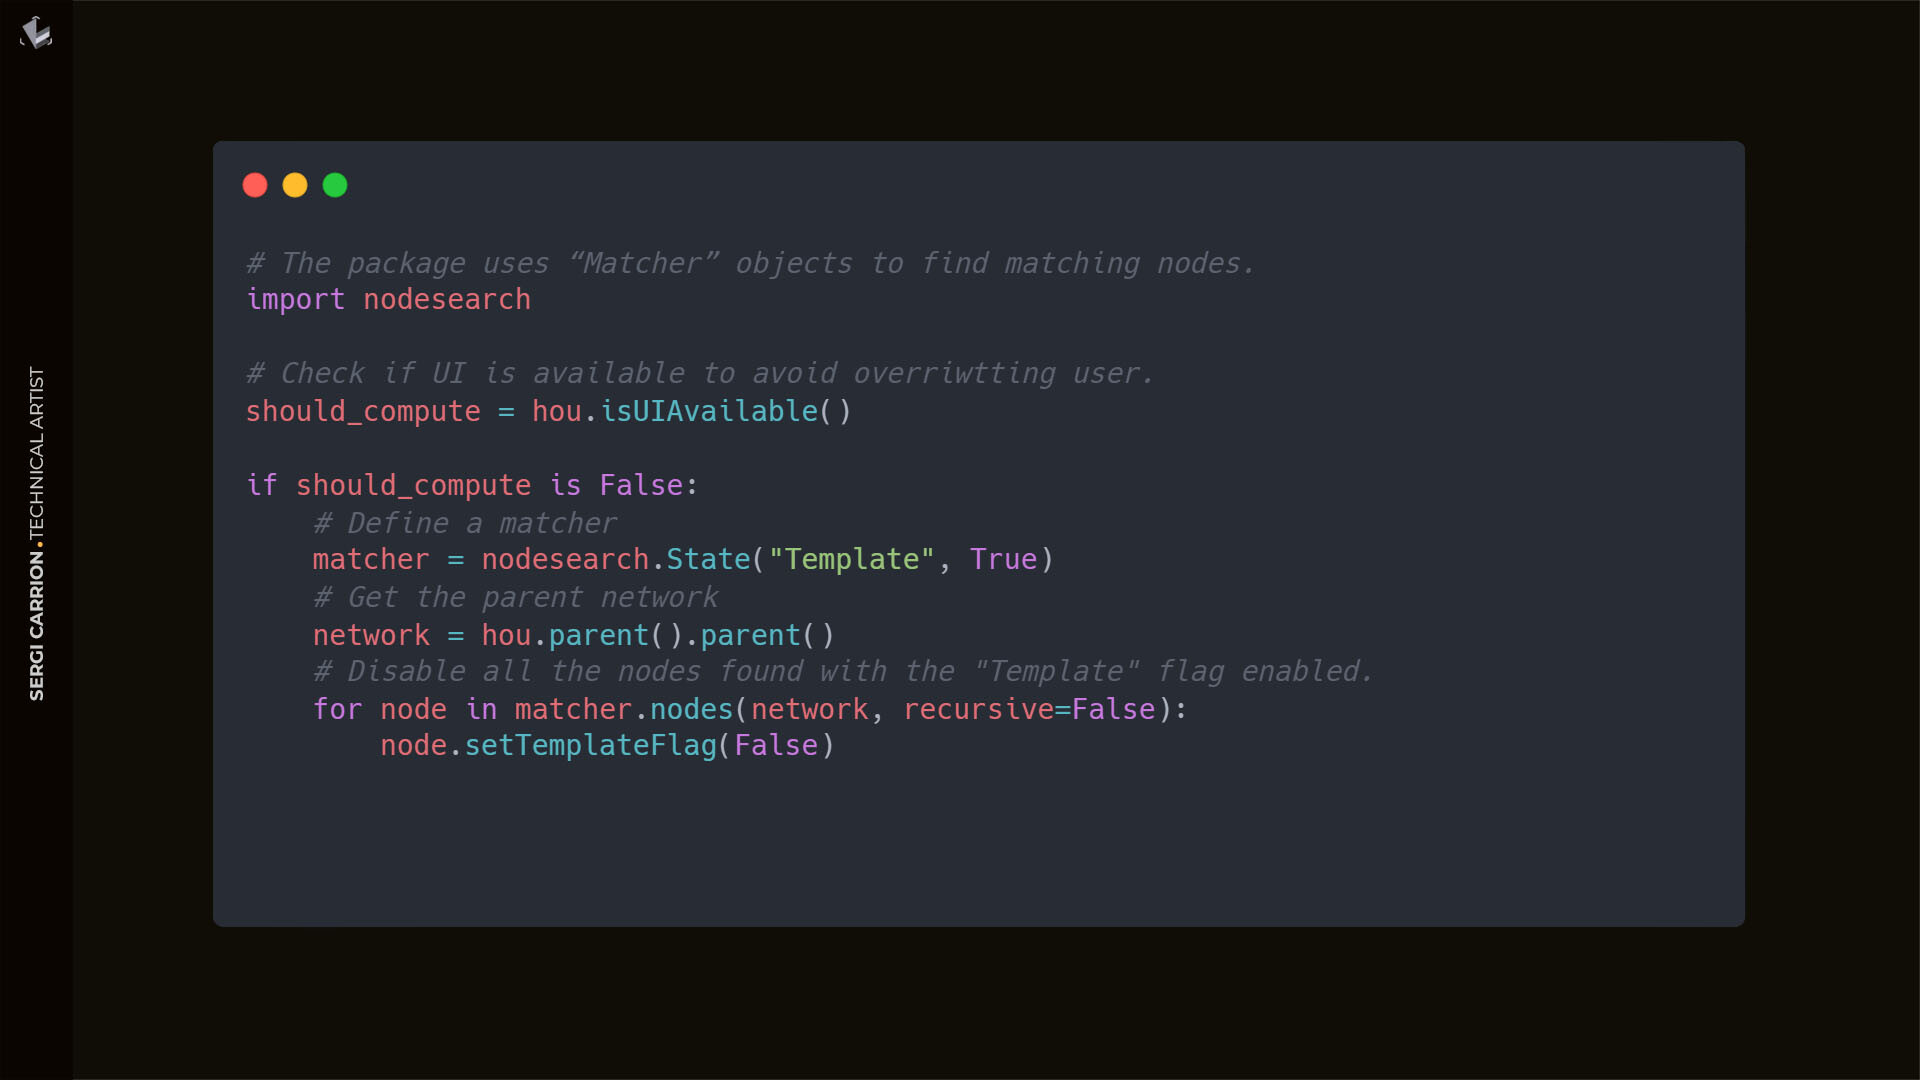
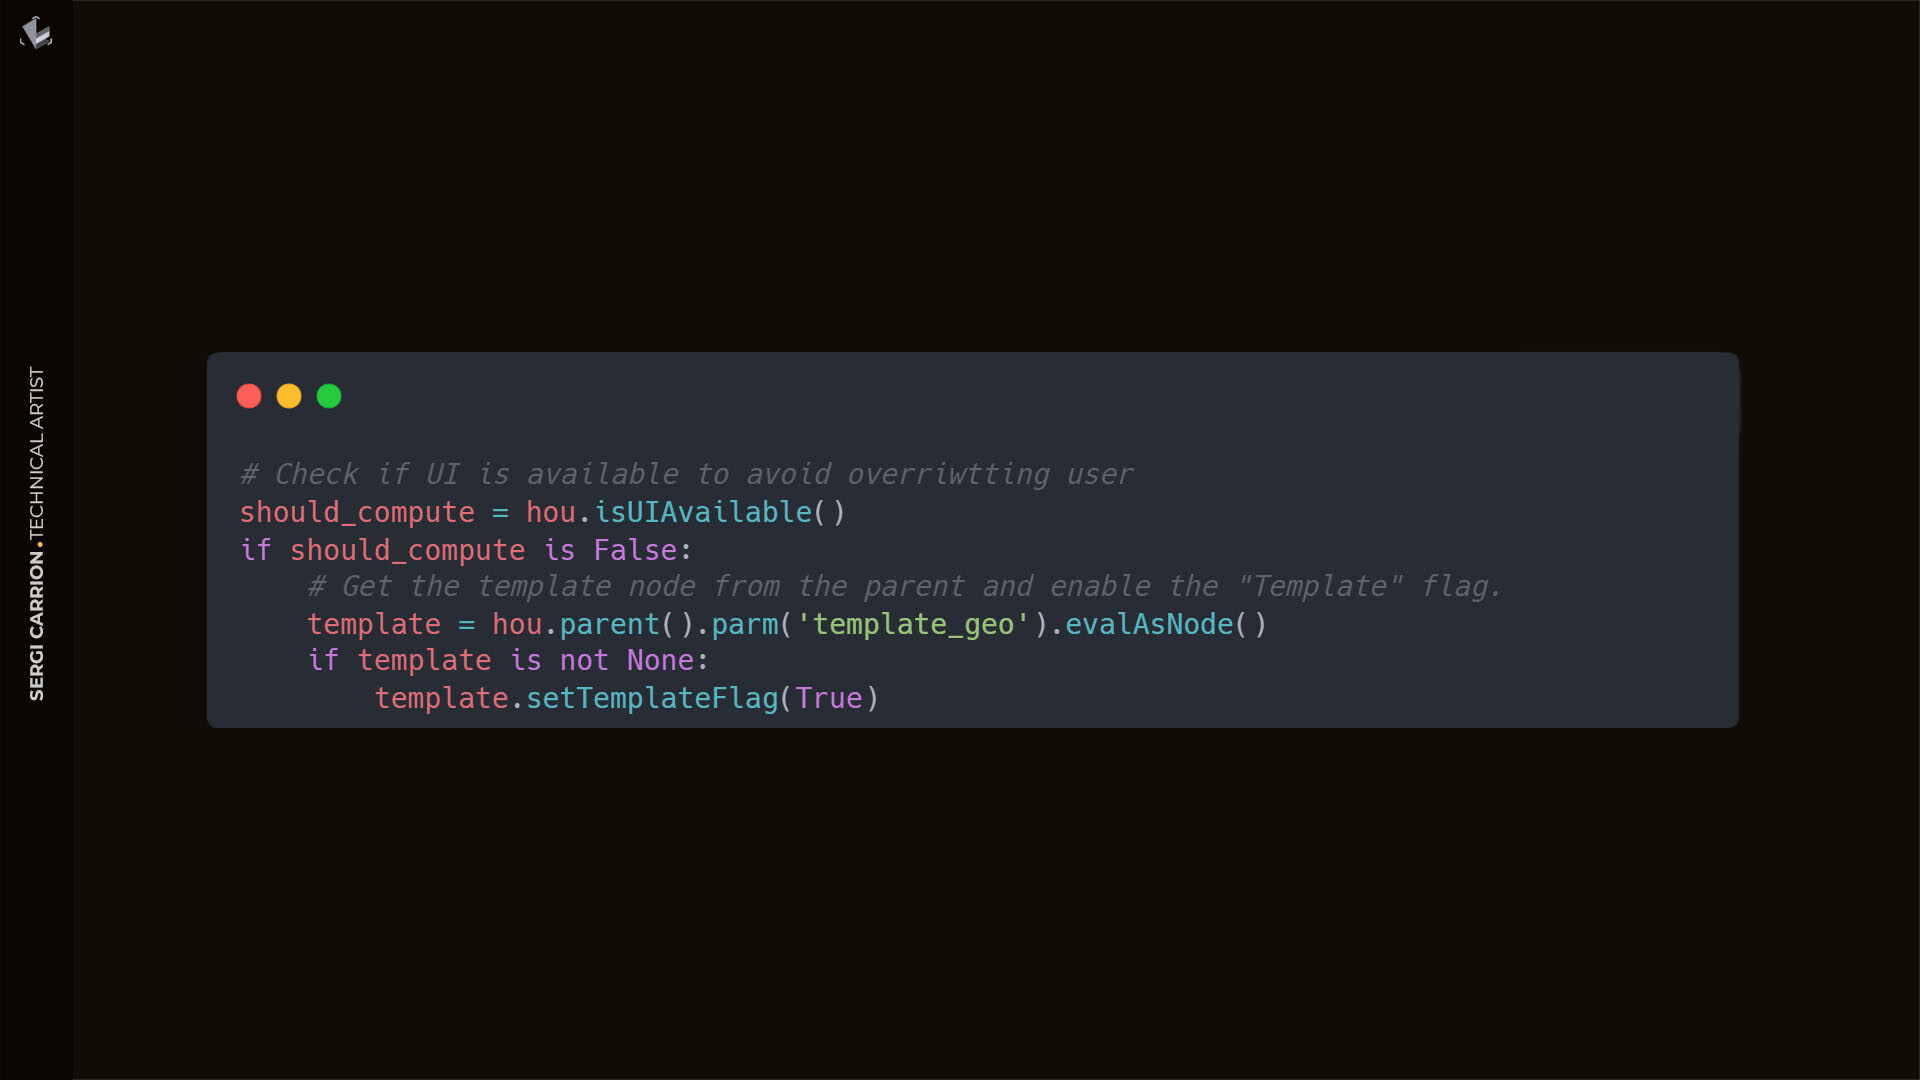
- Enable our guide's Template flag: Next, lets put down another "Python" node, and this time, from the HDA parameters, let's get the Operator Path that we previously set up. This could be done in just one node, but we'll maintain the separation for clarity. Each node functions as a distinct "Python function"—the first deactivates all "Template" flags if the UI is available, and the second activates the "Template" flag for our chosen SOP node.
- Save the HDA: Link the final Python node to the output, and then save your Digital Asset.
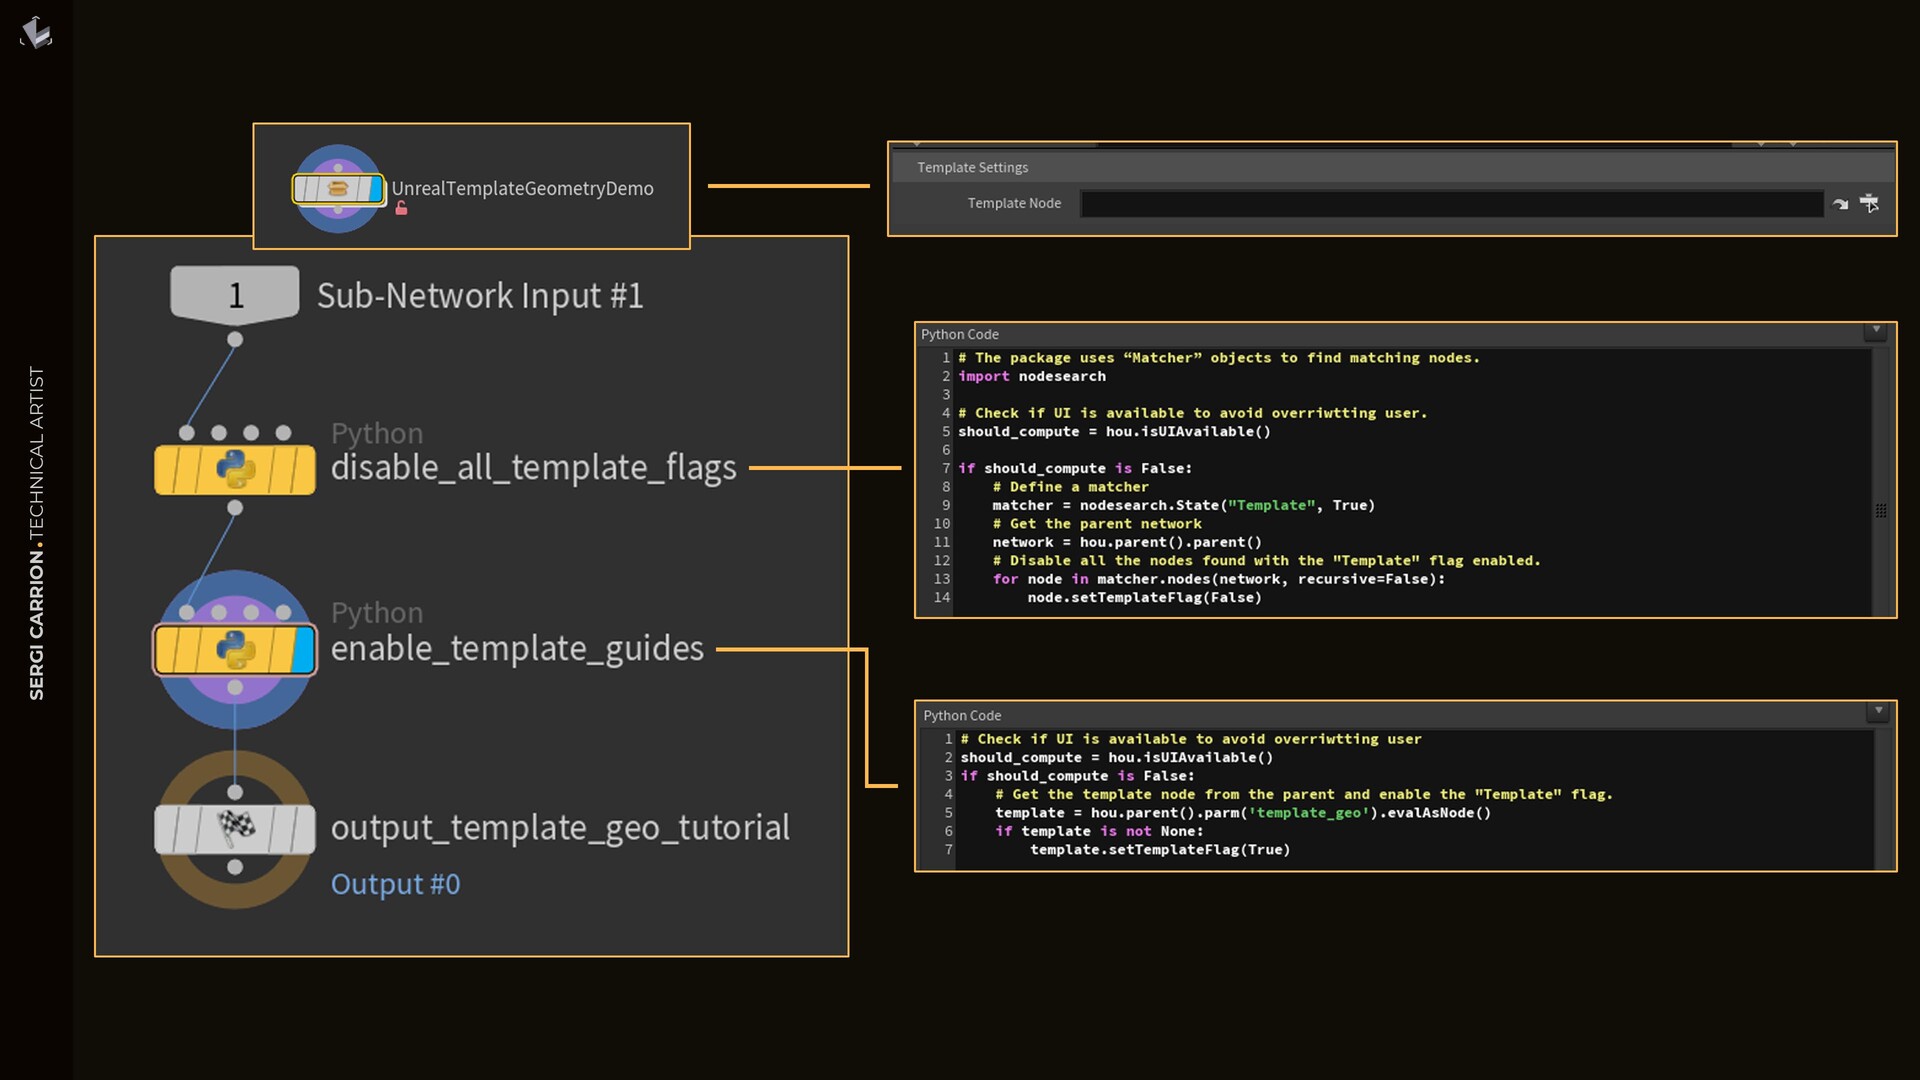
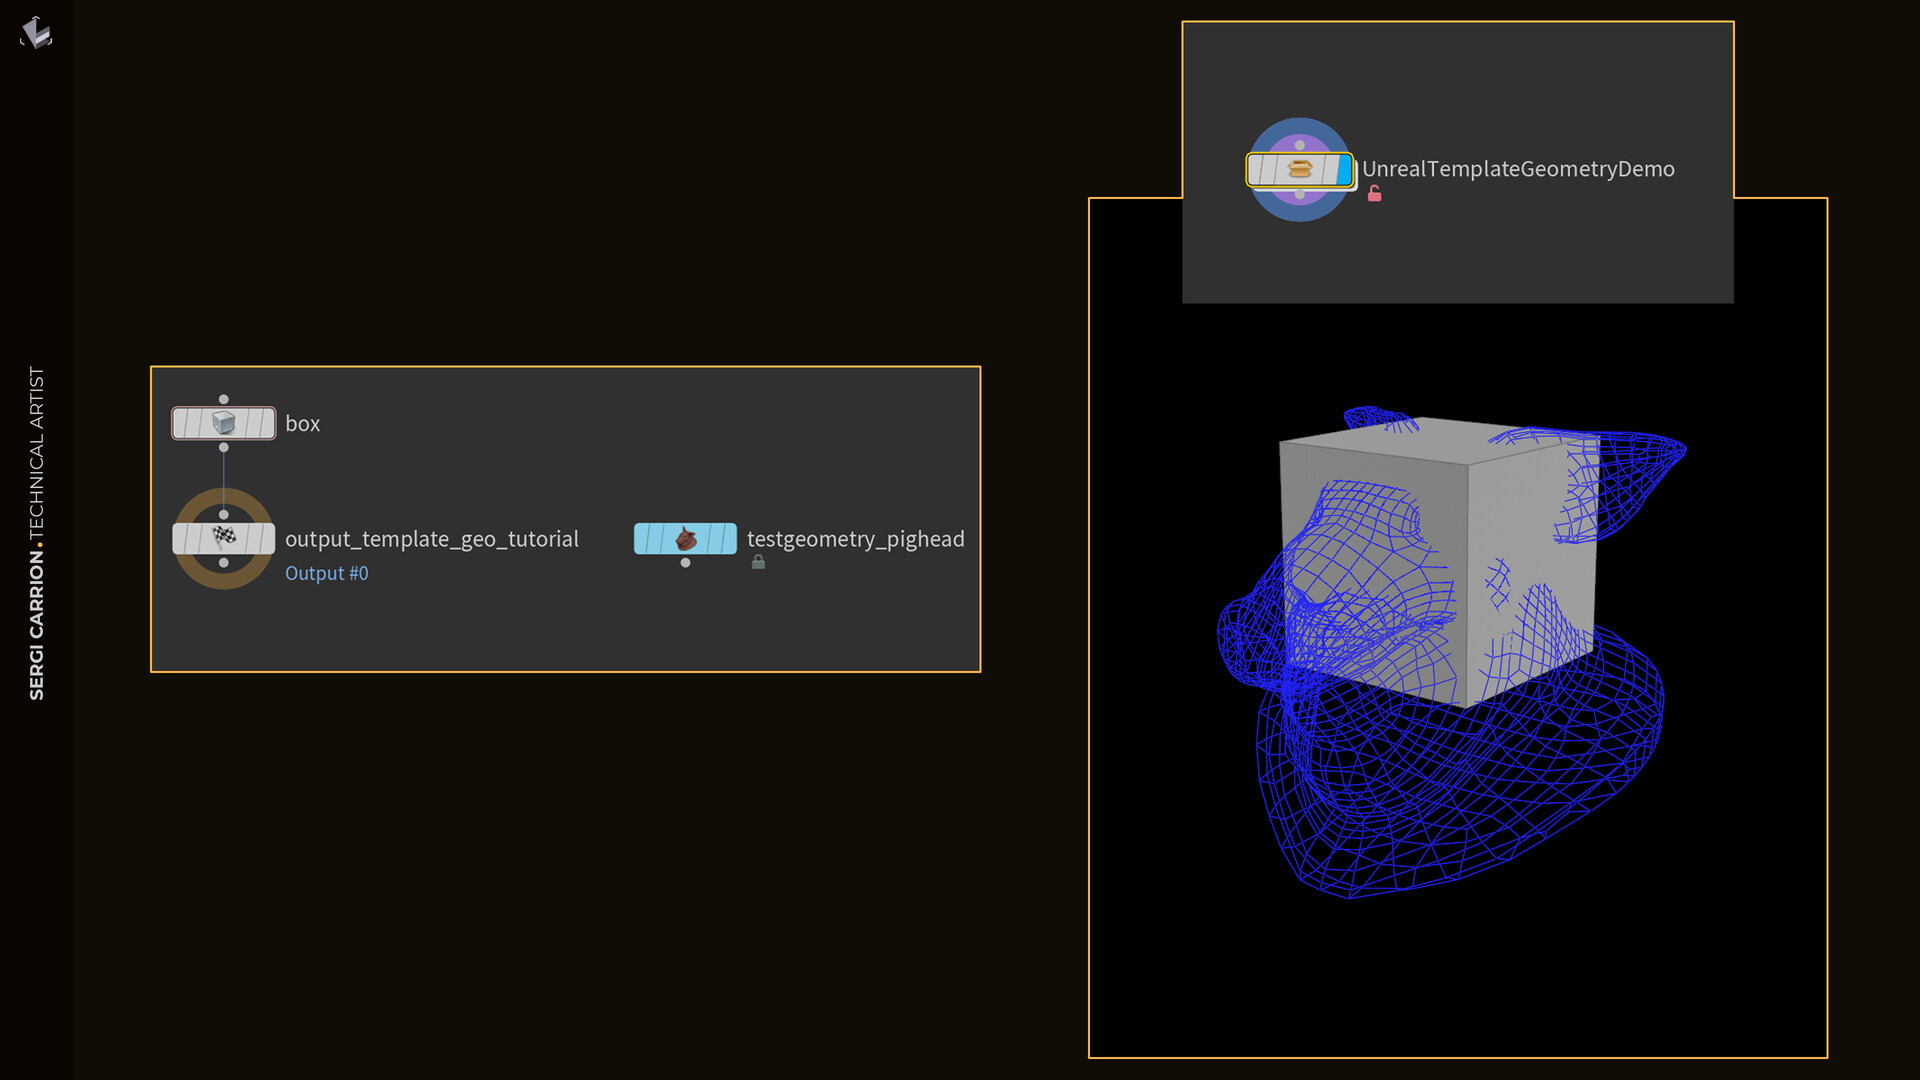
Once you've created your custom utility, it's time to integrate it into your workflow. Select the desired tool and place your custom HDA at the end of the graph, just before the "Output" node. Now, connect your "guide" node to the "Template Geometry Node" parameter as you would with any spare parameter. With this setup complete, save your primary digital asset.
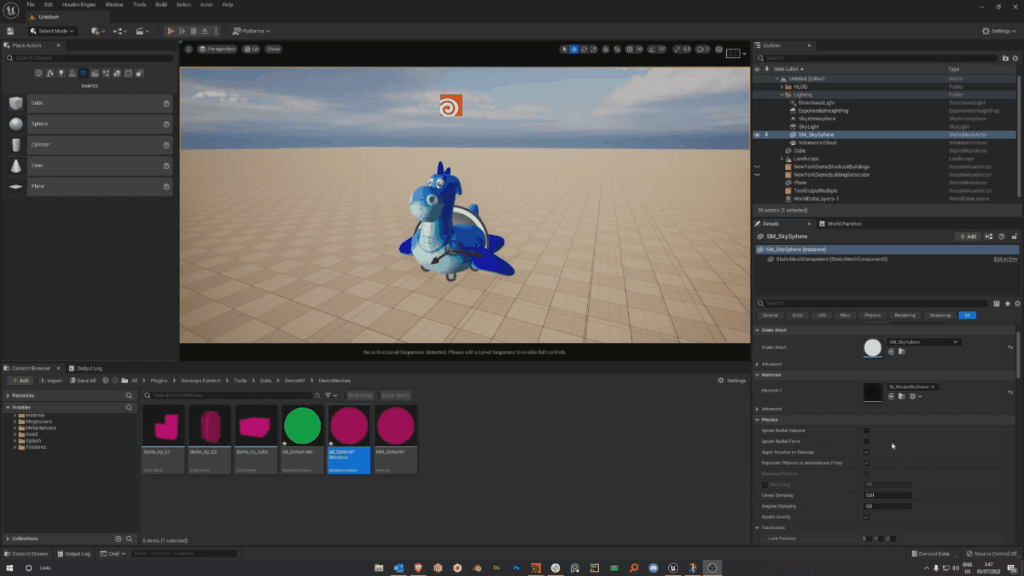
Now, re-import your tool into Unreal Engine and activate the "Use Template Geos" option. Your template geometry should be visible and good to go!
Final Result
Through Houdini attributes, you can customize and tailor the appearance or the visuals of your "Templated Geo". You will be able to see the geometry (not just the wireframe like in the "Guide Geometry"), make it use custom UE materials, instance meshes and so on. All of it knowing that this visualizers will not be baked into the HDA's final output, eliminating the need of toggling things on and off.
Thanks for reading :)!